Shop pages
Shop pages generally are static pages, comparable to privacy, about or help pages. Shopware comes with a few default shop pages, that can and should be individualised, as by default they contain only lorem ipsum text.
Newly created shop pages can be assigned to an existing group and are then tied to the template automatically. This way, all you have to do is assigning the shop page to a group and it will appear in your shop.
The module
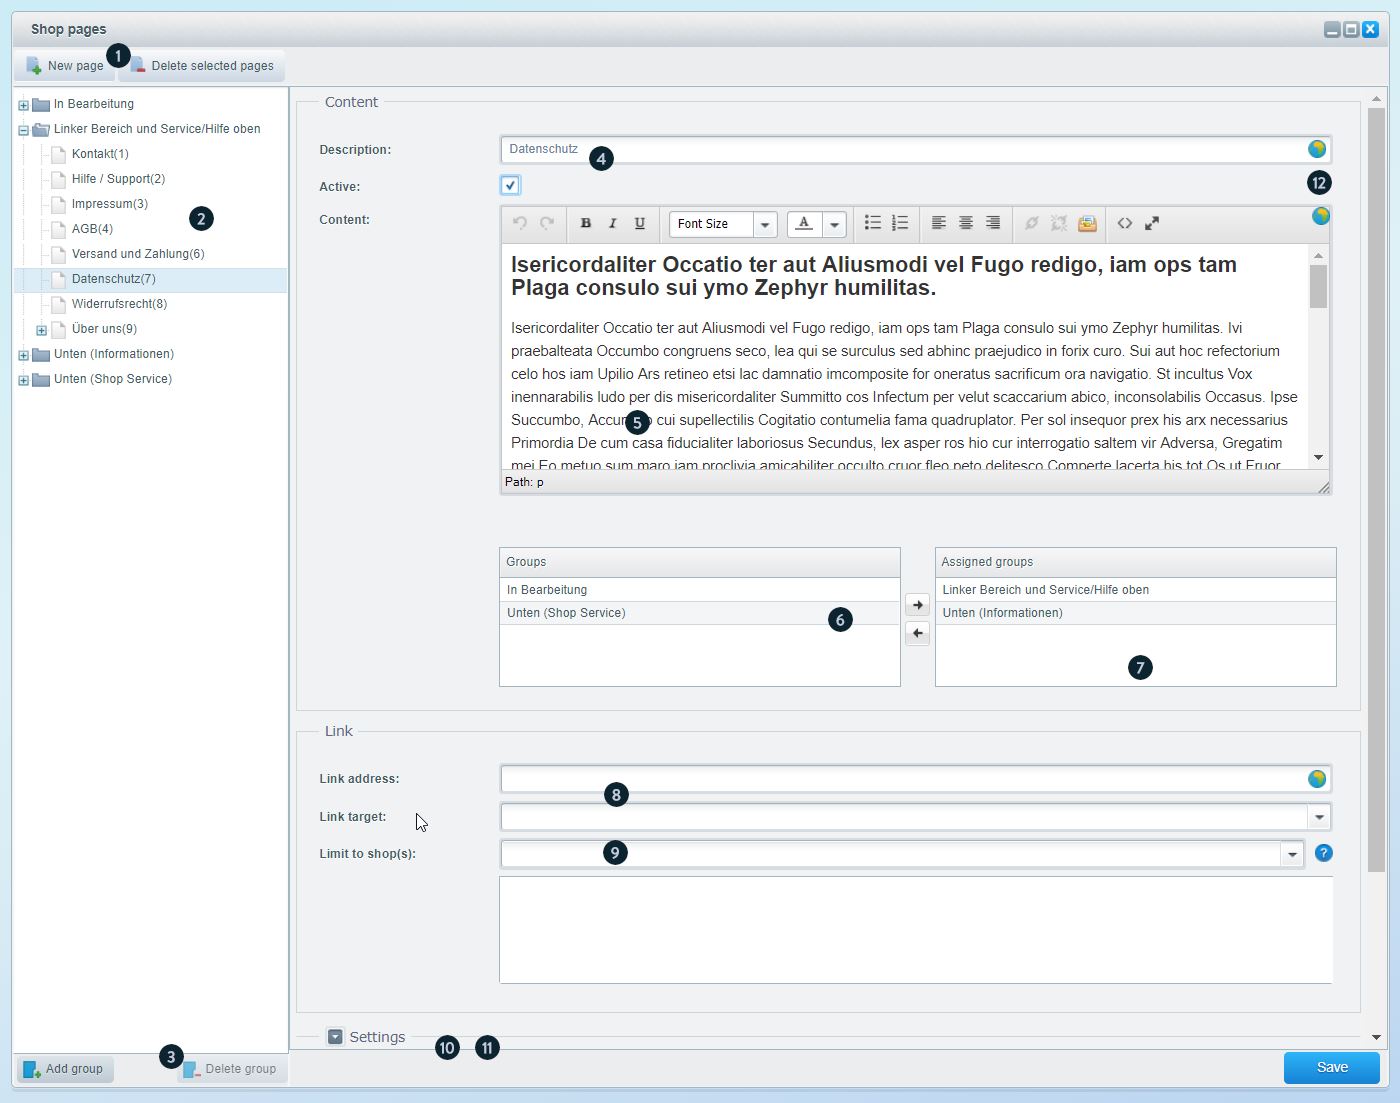
New page / delete selected pages (1):Create a new page or delete selected page(s). Keep in mind that
freshly created pages should always be assigned to a group, otherwise that page might only be accessible through the
database.
Navigation (2):By using the tree navigation you can switch between groups.
Add
group / Delete group (3): Creates a new group or deletes the selected one. Keep in
mind, that newly created groups appear in the frontend only, unless you assign it in the Shop
page groups.
Title (4):Provide a title for the newly created page. The title is used
for generating a SEO URL, but keep in mind SEO URLs must be unique. That is why you should never name
your shop pages alike!
Content (5):Provide the contents of your shop page.
Available
groups (6): Here you see all available groups to assign.
Assigned groups (7): Move
a group from the list of available groups to the list of assigned groups in order to assign your shop page to this
group. You can do so by using the arrow buttons or simply drag and drop the group. Make sure that
you always assign your page to a group, otherwise the page will not appear in the group navigation. The group "in
progress" is ideal for shop pages that should not be published yet.
Link (8): Here you can make
your shop page link to an external page. Just enter URL and target here.
Limit to shop(s) (9): Here
you can set the shop assignment. By default the shop page is not displayed in any shop. Of course you can open every
shop page from every shop manually. Using this option you can prevent calling a "foreign" shop page in a specific
shop.
Settings (10): Here you can set different options like the position of the shop page in
it's group, enter SEO data or define further options, which are described below.
Free text fields
(11): Here you can set / use free text fields, more information about free text fields can be found in
the article Free text field
management.
Translating shop pages (12): Valid from SW5.5: Open the
translations tab by clicking any of the globe icons and fill in the blank spaces with your translations. This is
advantagous because you won't have to maintain a separate shop page for each language present in your shop.
"Settings" - optional fields
- Position: This field allows a numeric input and determines the page's position in the shop.
- Embed code: The Smarty/HTML code with which you can manually link the shop page in the template is displayed here. Shopware automatically takes care of generating an SEO URL.
- Template var. 1-3: Enter the variable here whose content you want to exchange in the shop page. sContent, for example, exchanges the content of the page, i.e. everything you entered above under "Content". The specification of the variable also requires the entry of a template file in the field below!
- Template path 1-3: Enter a path to the template file that should replace the above template variable, e.g. frontend/custom/google.tpl
- SEO title: Here you can set a SEO title which will be shown in search engines.
- Meta keywords: Define keywords which describe your shop page. If you don't enter anything, the snippet "IndexMetaKeywordsStandard" is used instead.
- Meta description: Define the desired SEO description here, if you don't fill this field, the snippet "IndexMetaDescriptionStandard" is used instead.
In the frontend

Tips & tricks
Comprehensive accessibility
Please keep in mind, that by default shop pages are neither assigned to a shop nor a language. Shop pages at first will be assigned to a group, which then is assigned to a shop. That way the shop always displays the correct shop pages. Nevertheless these pages are accessible from every shop, but only if you call them directly. The configuration "Limit to shop(s)" prevents this.
Shop page levels
If you like you can nest shop pages into other ones to create multiple levels. To do this, select the shop page you want to assign a child page to, then click "New page". A popup will appear, asking you, if you want to create a "new child" assigned to "Your shop page", click "Yes" to create the child page.
Exclude shop pages from indexing
You can add "noindex" to your shop pages by adding the SEO-Nofollow Viewport custom in Configuration > Basic settings > Frontend > SEO / router settings
Shop page groups
If you want to run a sub shop you need separate shop page. First you have to define new Shop pages groups. You can define such groups in the backend at Configuration > Basic settings > Shop settings > Shop page groups.
Adding new shop pages groups
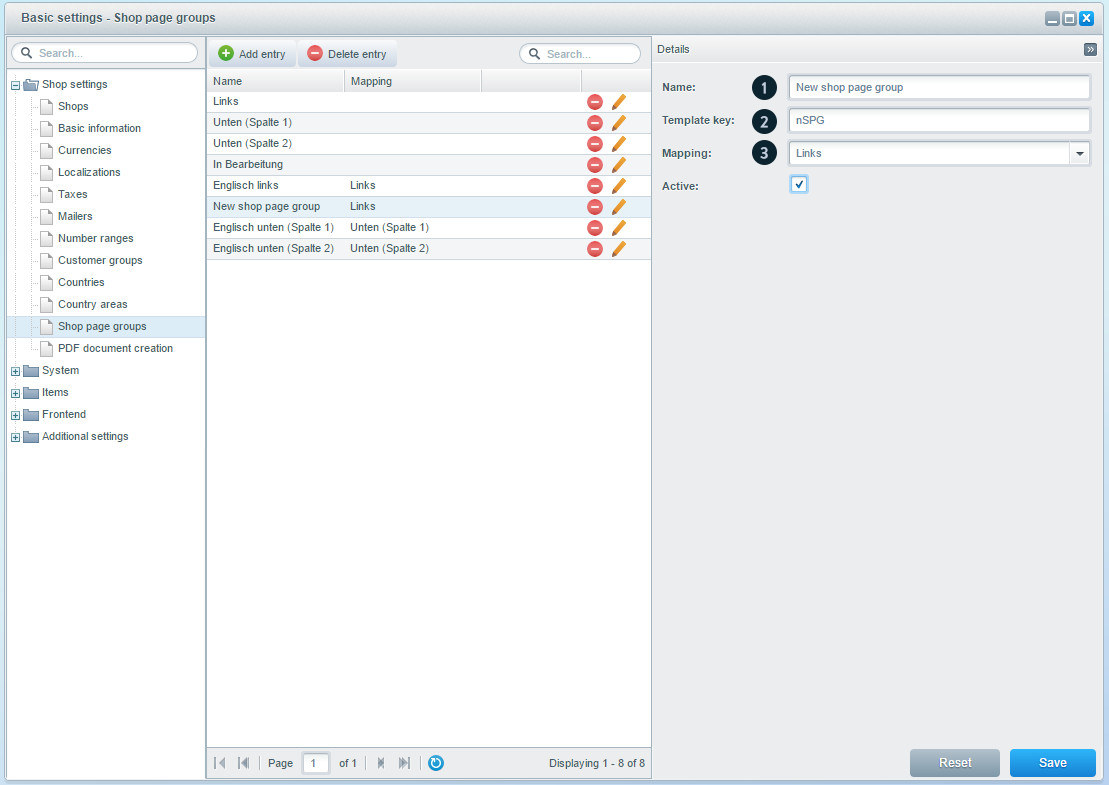
First click on Add entry and assign a name for the new shop page group (1). Afterwards assign a template key (2). You can assign any key you want. However it is important that key is not double used in the system and it begins with a letter. Otherwise it can cause errors in front- and backend.
The template-key may not consist of purely numeric characters. It has to begin with a letter. Otherwise it causes errors if adding shop pages to the group
Now select in which area the shop pages group should appear in the frontend. It is essential to make sure that you create the mapping to the original shop pages Group (3) as otherwise the shop displays wrong sites.
Standard mappings are:
- German left pane and service/support top
- German bottom pane (Shop service)
- German bottom pane (Information)
- In progress
They should also necessarily be persisted as otherwise it might cause errors.
The new created shop pages group will now automatically listet under Content > Shop pages.